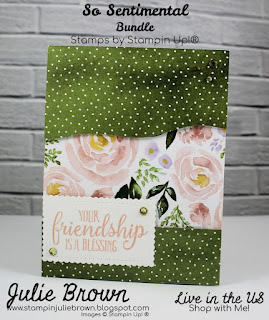
Do you ever wonder what to make from all those Sentimental Stamp sets. Well the So Sentimental Bundle from Stampin Up!® not only has great sentiments but matching Dies! Here are few cards made with this bundle and adding the Best Dressed Designer Series Paper. These are quick cards to put together!
Aquick Wedding card using the So Sentimental Bundle and Best Dressed Designer Series Paper
Layer 2 – Best Dressed DSP 3 x 5 (cut outs)
Layer 3 – Whisper White 3 x 4
Layer 4 – Whisper White 4 x 5 1/4
Project Recipe:
Adhere 4 3/4″ of the ribbon onto Layer 1 centering and keeping top edge flush with card base.
Here’s a quick card to send to a friend. It’s so easy you’ll want to make several!
Layer 2 – Best Dressed DSP 1 3/8 x 4 1/4 and
3 x 4 1/4
Layer 3 – Whisper White 2 1/2 x 4
Layer 4 – Whisper White 4 x 5 1/4
-
Layer 1 – Adhere to the card front about 1 1/4″ from bottom edge.
-
Layer 2 – Adhere the 1 3/8 x 4 1/4 strip to the bottom of the card front using Stampin Dimensionals keeping bottom edges flush.
Then cut a wave pattern in the 2 3/4 x 4 1/4 piece and adhere with Stampin Dimensionals to the top section of the card front keeping edges flush. -
Layer 3 – Stamp the sentiment in Petal Pink then using the Stitched So Sweetly Dies cut out label. Adhere to the card front as shown using multi purpose liquid glue on the bottom half and Stampin Dimensionals on the top section.
-
Layer 4 – Adhere to the inside of the card and either stamp a sentiment or write a note.
-
Color the Basic Rhinestone jewels with the Dark Old Olive Stampin Blend marker then add to card front: Three in top right corner and two on the sentiment label.
Need a sympathy card or get well card. Here’s the one for you! Very quick and easy!
-
You will need about 10-12″ of the Whisper White Crinkled Ribbon. Color about 5 1/2 ” with the Dark Blackberry Bliss Stampin Blend then set aside to dry. Tie a bow with the remaining ribbon.
-
Layer 1 – Adhere to the bottom of the card front keeping edges flush.
-
Layer 2 – Stamp the sentiment in Blackberry Bliss ink then cut out with the Stitched So Sweetly Dies. Then using Stampin Dimensionals adhere to the upper section of the card front centering.
-
Once the ribbon is dry adhere it to the card front just above the DSP. It will be longer than the card front so you will need to trim off any sections that overlap.
-
Layer 3 – Adhere to the inside of the card.
-
Add the white bow to the center of the colored ribbon and add three of the Noble Peacock Rhinestones to the top of the card.
It’s someones Birthday and look at this fun card! Your friends or family would be thrilled to see this one when they open the envelope.
Layer 2 – Best Dressed DSP 2 x 3
Layer 3 – Whisper White (3) 1/2 x 1 3/4
Layer 4 – Purple Posey 2 x 3
Layer 5 – Whisper White 1 1/2 x 2 1/2
Layer 6 – Whisper White 4 x 5 1/4
-
Layer 1 – Adhere to the card front vertically about 1/4″ from the top and left edge.
-
Layer 2 – Adhere to the card front horizontally about 5/8″ from top edge and 1/4″ from right edge.
-
Layer 3 – Stamp the confetti stamp onto the three strips with Mint Macaron Ink and Daffodil Delight ink as shown. Then adhere to the card front as shown.
-
Layer 4 – Using the Stitched So Sweetly dies cut out a label. (This die should be the one bigger than you use for the next layer)
-
Layer 5 – Stamp the sentiment in Mint Macaron ink then cut out with the Stitched So Sweetly Dies. Then adhere to the Purple Posey die. Using Dimensionals adhere them both to the card front as shown.
-
Color three Basic Rhinestone jewels with the Dark Mint Macaron Stampin Blend then adhere to card front as shown.
Adhere to the inside of the card.
Layer 2 – Best Dressed DSP – 2 x 5 1/2
Layer 3 – Whisper White – 2 x 3
Layer 4 – Best Dressed DSP – 1/2 x 5 1/2
Project Recipe:
-
Color the ribbon and 5 of the Rhinestone Basic Jewels with the Dark Blackberry Bliss Stampin Blend. Set aside to dry.
-
Layer 1 – Adhere to the card front
-
Layer 2 – Adhere to the card front center top to bottom and keeping right and left edges flush.
-
Layer 3 – Stamp the sentiment in Blackberry Bliss then cut out with the Stitched So Sweetly Dies. Attach the ribbon to the back with Mini glue dots as shown then adhere to the center of layer 2 using Stampin Dimensionals.
-
Layer 4 – Adhere to the inside of the card along the bottom edge.
Don’t forget leave me a comment below!
Product List


