

Stamps are a vital tool to card making. You might already have several or you may be new to world of stamps. Everyone has their favorite kind but it’s good to get to know each type. This article will focus on the different types, how each one is used, the different styles and how to care for them.
First we will cover rubber stamps, the images are carved into the rubber. They come in a variety of colors, blue, purple, gray, pink, white and the most prevalent are red. They are available in three different options. Wood Mount, Cling and Unmounted.
Wood Mount Stamps

I think most of us are familiar with Wood Mount. These were the first stamps that I remember seeing, and purchasing when I got started with stamping. The rubber image will be mounted on a foam backing and be mounted permanently onto a wood block. A label is stuck to the opposite side of the block so you know the placement of the stamp.
Depending on where you purchase them, some are already mounted for you while others will come together with the wood blocks and you will have to mount them yourselves. Not to worry if this is the case they will have a removable covering on the back side of the foam backing that you pull off and then adhere to the block.
You will also need to adhere the label on the other side of the block. This can be troublesome because if you don’t place the label on the wood block exactly where the rubber stamp is, your image can often be crooked or at an angle on your finished project. Wood Mount stamps lend to a crisp, clear stamped impression each time.
Wood Mount stamps will last a long time if they have been made with premium rubber. Some people still love wood mount stamps but they do take a bit more space to store.
Note: It is possible to detach these and make them into cling stamps if you desire too. I have not done this but I have seen it done successfully. You can find the process on YouTube or Google.
Cling Stamps

These are red rubber stamps that are mounted on a foam base to insure a better stamped image. You don’t need a wood block as they are designed to be mounted temporarily onto reusable acrylic blocks. These usually come with a two sided sticky label that needs to be attached to the foam base and this allows it to stick to the clear acrylic block. This process is pretty easy.
Check out this video to see how easy it is to do.
You will want to make sure that you are purchasing cling stamps that have a high quality rubber and that the images are cut well into the rubber. Cling stamps have become very popular because they deliver the same crisp, clear stamped image as the Wood Mount but can be stored easily and do not take up as much room as Wood Mount stamps.
Unmounted Stamps
Rubber stamps also come unmounted which means all you get is the carved rubber image. You use them with acrylic blocks just like the Cling stamps but you will need to use a removable adhesive to mount them each time. This can become time consuming as you will have to clean up both your stamp and block after each use. The adhesive can be a little tricky to get off and can leave a sticky residue on your block.
Since these stamps do not have a foam backing it’s important that you use some kind of foam cushion (piercing mat) underneath your paper to help you to get a good image. If you find you have a few of these and are not happy with how they are stamped, it is possible to turn them into cling stamps. There are several tutorials available to help you with this process.
Clear Stamps
Several years ago two new types of stamps were created. Acrylic and Photopolymer. They hit the stamping world by storm as they were clear, and you could see exactly where you were stamping. Eureka! These are great for beginner stampers as it takes the guesswork out of positioning your image. It has made it possible to design cards for easy and quick stamping as well as some new fun techniques. So let’s compare these two types of newbies to the stamping world.
Acrylic Stamps
These can be looked at as inferior to the Photopolymer stamps for the following reasons. They are lower quality, and less durable as most of them are manufactured in China. These are the stamps you often see as free giveaways. There are exceptions to the rule and you can find good quality Acrylic stamps but you will need to do your research. Acrylic stamps have a different feel to them, they are softer and stretch easily which can cause them to be torn. A good rule of thumb when working with these stamps is to lift and then carefully roll them up and away from their storage sheet to avoid overstretching or tearing. Acrylic stamps also stamp differently than Photopolymer stamps. The ink tends to bead up which can cause an undesirable outcome in the stamped image. This can be frustrating for beginner stampers but with time and patience these stamps can be a good addition to your collection.
Photopolymer Stamps

Photopolymer stamps are considered the cadillacs in the stamping world. They are higher quality and last longer than Acrylic stamps. You can feel and see the difference in a side by side comparison.
Photopolymer stamps are stiffer, less pliable and heavier. They also will appear more shiny and transparent than Acrylic stamps. One thing you will notice right away is the distinct smell that Photopolymer stamps have when you first open them. This is due to the ratio of resin used in the creation of these stamps.
Once mounted onto an acrylic block it’s very easy to get the perfect placement of your image. They’re flexible and easy to line up which gives you even more creative possibilities. You can bend, mix and match and layer your images easily. They adhere to the blocks well.
Sometimes these stamps do have a protective coating on them when arriving and you will need to condition them to ensure a crisp detailed image when stamping. There are two methods to condition these stamps. First ink up the stamp, then stamp the image onto a scrap piece of paper. You need to do this several times to properly condition the stamp. Secondly, if you have a Versamark ink pad you can ink up your stamp, stamp off, (onto your scratch paper), and immediately ink up your stamp in the desired ink, and you’re ready to go! Photopolymer stamps are great for beginner stampers as well as long time stampers.
It is advisable to place some type of foam or silicone mat underneath the paper when stamping with Photopolymer and Acrylic Stamps. This allows for a crisper stamped image.
A good tip for getting good placement onto the Acrylic Blocks for both Acrylic and Photopolymer stamps, is to lay the stamp face down onto your work surface. Then you can place your clear block over it, press down onto the stamp and pick it up. This can help make sure that the stamp returns to its regular shape after pulling it from the backing. Due to the great flexibility of these types of stamps, they can become a bit misshapen without doing this step.
Note: Both Acrylic and Photopolymer stamps will stain but this does not hurt them at all and does not stop you from getting a good image when you stamp.
Now that we know the kinds of stamps, let’s talk a little about the different stamp images or styles. There are basically two types or styles of stamps designed for all of the kinds of stamps previously discussed. Line or outline and solid or bold images. To help you better understand these differences we will look at examples of each one.
Lined or Outlined Stamps
Lined or outline stamps are those that have an outline image and are made to be colored. These allow us to really use our creativity with different color combinations to create unique and beautiful images.
You can color them in with dye ink markers, alcohol blend markers, watercolor painters, colored pencils, dry chalk and blender pens.
Heat embossing is very popular with lined and outlined stamps. By stamping your image with versamark ink then covering it with embossing powder and heating it up it gives you a raised outline that helps to stay in the lines when using any of the above mentioned methods.
For more information on all the coloring mediums check out my Coloring Techniques post.
In most cases these stamps can be a little challenging for a brand new stamper because it does require more products to add color. New stampers can be a little hesitant in their coloring ability at first, but by attending a local stamping class or watching coloring videos they will be coloring like experienced stampers in no time at all.
One tip for those of you who don’t like to color or feel like you’re not good at coloring you can always stamp them onto colored card stock then no coloring is needed.


This stamp set is from the Stampin Up® July – December 2022 Mini Catalog. It may or may not be available depending on when you are viewing this post. It remains here as an example of an outlined stamp set.
Solid Image Stamps
Solid images stamp all in one color.
If you use black ink then your image will be black. You can change up the color by changing the ink color.
Now there is a way to add more than one color to these solid images by using approved markers and coloring directly onto the stamp. It’s very important that you use the correct type of marker for this so that you do not ruin your stamps.
There are a few other mediums that will help you to add color to solid images.
Make sure to check out my post on adding color to any stamp.
This style of stamp is the easiest for new stampers as you just ink them up and you’re on your way to creating beautiful cards, scrapbook pages and other projects with very little effort!


This stamp set is from the Stampin Up® 2022-2023 Annual Catalog. It may or may not be available depending on when you are viewing this post. It remains here as an example of an solid stamp set.
Combination stamp sets
You will find that some stamp sets have a combination of Lined and Solid images which will give you plenty of variations to try out in your stamping.


This stamp set is from the Stampin Up® 2022-2023 Annual Catalog. It may or may not be available depending on when you are viewing this post. It remains here as an example of a combo lined and solid stamp set.
Note: The card on the left was created by stamping two tea cups then coloring them in with Stampin Blends Alcohol markers. The card on the right the tea cup was inked up then stamped!
Two Step Stamp Sets
There is a newer variation of this combination called Two Step Stamps. Two Step stamps come with an outlined image that you can color in and there is a solid corresponding image that fills in the color for you. So if you’re in the mood to color you can but if you want a quick and easy card then you can just use the solid image, ink it up, stamp it and you’re done!

This stamp set is from the Stampin Up® 2022-2023 Annual Catalog. It may or may not be available depending on when you are viewing this post. It remains here as an example of a two step stamp set.
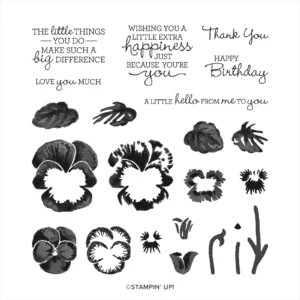
Can you see how the pansies were created by using a lighter color for the solid image than a darker shade for the detailed image.
Reversible Stamps
Reversible stamps are another new addition to the stamping world. They give you the ability to use both sides of the stamp.
This means you ink up the flat side, stamp it, clean it, then flip it over on the block and use a different shade or color, and stamp the detail on top of the first image.
These stamps typically do not line up exactly and they are not meant to but it gives the stamped image a unique look.
These usually don’t require any coloring as they lean more to the solid image stamps but do create a fun variation to the solid stamp sets.

This stamp set is from the Stampin Up® 2022-2023 Annual Catalog. It may or may not be available depending on when you are viewing this post. It remains here as an example of a reversible stamp set.
DistINKtive Stamps (patent pending)
Stampin’ Up® has created and designed a unique type of stamp. It’s called a DistINKtive stamp. Yes this is the way Stampin’ Up® spells it, because it is distinctive to them.
These will quickly become one of your favorites as they have a special texture that adds depth and dimension in a single step.
This means when you stamp them all you have to do is ink it up, stamp it and you have a beautiful image that is almost photo-realistic.
Great for quick and easy cards. They come in both Cling Stamps and Photopolymer stamps.


This stamp set is from the Stampin Up® 2022-2023 Annual Catalog. It may or may not be available depending on when you are viewing this post. It remains here as an example of a DistINKtive stamp set.
Notice how when the image was stamped that it looks like a picture! All you do in ink them up then stamp and you get a beautiful image everytime!
Picking Stamps!
So are you ready to choose some stamps! I know that sounds easy but it can be daunting when you look at a stamp catalog for the first time. Here are some suggestions to make choosing your first stamps a little easier.
- First think of what kind of cards you want to make and send (birthday, Christmas, thank you etc.)
- Then find the stamp sets that have those images and sentiments.
- You may also want to look for other stamp sets that you can use for many occasions.
- Remember you will find sets that only have images. They will be useful if they fit the kind of card you will be creating.
- Don’t forget to invest in a few sentiment only stamp sets. These will be a great asset to your stamp collection.
Here are a few of my favorite sentiment stamp sets that I use all the time!


Care & Cleaning
Now that we have covered the types of stamps, let’s talk about the care and cleaning of your stamps. Proper cleaning and storage of your stamps is the best way to extend their life. Here are a few tips to cleaning and preserving your stamps.
The best time to clean your stamps is straight after stamping, because when the ink dries it is harder to remove. Before using any of the cleaning methods listed below it’s important to stamp onto a scrap piece of paper, such as grid paper or copy paper, to remove as much of the ink as possible. Then use one of the cleaning methods listed below.
As noted above some stamp types can become stained after repeated use. The good news is if your stamp is stained BUT clean, it will not transfer old ink onto your new project!
Here is a list of helpful supplies you may want to have on hand to ensure proper care of your stamps.
- Simply Shammy by Stampin Up®
- Stampin’ Mist Stamp Cleaner, or other universally approved Stamp Cleaner
- Soap and Water
- Clear airtight case
- Scrubber pad (Stampin’ Scrub by Stampin Up® now retired)
- Staz-on cleaner
- Baby Wipes (no alcohol) or Microfiber cloth
Now let’s talk about cleaning methods.
- Simple Shammy and water. This is my favorite method! It’s important that you have an airtight container to store your shammy in to keep it moist. I use the clear stamp cases sold by Stampin Up®. All you have to do is dampen the shammy with water then rub the stamp onto the shammy or wipe the stamp with the shammy to clean it. When the shammy gets full of ink all you have to do is rinse it out and it’s ready to go! This has proven to be a gentle and effective cleaning tool. Effective in cleaning most water based and pigment inks. The shammy is a good tool to use on a daily basis. If you come across a stubborn ink that will not come off with this method then follow the method mentioned in step two.
- Stampin’ Mist Cleaner and Stampin’ Scrub. Choose a stamp cleaner that has been approved to be used on all kinds of stamps. Some cleaners are also stamp conditioners that come in handy to help to extend the life of your stamps. Stamp Cleaners are especially useful, and may even be necessary, for solvent or alcohol-based inks. They have shown to be helpful in cleaning water-based pigment and archival inks. This method is good to use at least once a month on your stamps if you use them frequently. All you need to do is spray the cleaner onto one side of your scrubber pad, rub your dirty stamp into the moistened pad working gently in a circular motion to ensure that the cleaning solution and the bristles get deep into the stamp’s grooves. You will need to wipe the stamp for about 5 to 20 seconds or until the ink loosens up. Then wipe the stamp on the dry half of the scrubber pad. Move it around with gentle pressure using the same circular motions to allow the pad to absorb any remaining moisture and ink. If you do not have a Stampin’ Scrub, use a soft bristled toothbrush to get into the nooks and crannies to remove stubborn ink.
- Soap and Water. You will need to use a mild soap for this. I have found that Dawn Dish Soap works very well on stamps. This method is helpful when your clear stamps lose their stickiness. When they get dirty from dust, debris, or even the oils from your hands, they sometimes won’t stick to the acrylic blocks. Follow these next steps to rectify that problem. I strongly advise you to use CAUTION, and make sure to not do this in the sink directly, since smaller stamps could be accidentally washed down the drain. It’s best to wash them in a bowl then rinse them under water with a safety bowl beneath the faucet or work surface. After air drying the stickiness will come back and you are ready to get back to stamping. It is preferable to not clean the cling stamps this way as it can dampen the foam padding which could cause problems for you in the future.
- There are some solvent inks out there like Staz-on brand inks that require a special cleaner. Luckily the makers of the Staz-on ink have created a cleaner that works great to remove their ink. It is critical that you clean your stamp as quickly as possible when using Staz-on as it stains quickly and can be difficult or even impossible to remove if you leave it on too long. If you come across another brand of solvent ink I highly recommend buying the cleaner that is recommended to properly clean your stamps when using their ink.
- Baby Wipes and Microfiber clothes. Now I am listing baby wipes and microfiber clothes as a last resort for cleaning as they tend to leave fibers in the stamps that can affect your finished stamped image. They can be handy if you are needing to clean your stamp quickly or are traveling with your stamps. A plus-side of having these wipes available is that they are gentle enough to clean ink off your hands. Avoid any cleaning wipes containing alcohol, since they will dry out the rubber and you may damage the stamp with repeated use.
When caring for your stamps there are a few differences between Rubber, Acrylic and Photopolymer stamps. The cleaning methods listed above will work for all but there are some things to consider.
Care of Acrylic & Photopolymer Stamps. These stamps are a little more delicate so it’s important that when handling them, that you do take some care. They do best using the Simple Shammy and water, due to how gentle this method is on the stamps. If you decide to use a stamp cleaner you will need to make sure it is designed for Acrylic and Photopolymer stamps so that you don’t break them down. I do want to caution again about using baby wipes as they tend to leave debris behind and can be harsh on clear stamps.
Rubber Stamps do not take an abundance of care. It is best that you clean them as quickly as possible after use. It is also important to clean them with a universally approved stamp cleaner that conditions at least twice a year to help keep the rubber in good condition.
When cleaning wood mount stamps you will want to be careful not to get cleaner onto the wood. This can soften the wood over time and cause deterioration.
No matter which method you decide to use for your stamps, get into a habit of cleaning your stamps before you store them. Stamps should be completely dry before being returned to their storage cases. Following these guidelines you can be assured that your stamps will last a long time.
Thanks.